
 Building Bridges Student Handout
Building Bridges: Triangles and Quadrilaterals
Submitted By:

Students look at local bridges and create their own structures out of straws to explore properties and classifications of triangles and quadrilaterals. They observe through experimentation that all triangles are rigid while quadrilaterals are flexible.
In Lesson 2: Why Are Triangles Rigid?, students use angle measurements to explore why triangles and quadrilaterals have these properties.
- In urban areas, you should be able to find and take pictures of bridges, overpasses, temporary scaffolding, or elevated train platforms with visible metal frames that contain triangles. You may wish to collect pictures with students on a photo walk to find these kind of metal structures in your neighborhood.
- Alternatively, you can use the Philadelphia pictures on the student handout
- For each student or small group have available either of the following:
- 50 non-bending straws and 100 standard-size metal paperclips OR
- 50 hollow plastic coffee stirrers and 50 twist ties
- Note: Cutting the straws into different lengths (2, 3, 4, 5, 6, and 8 in) ahead of time will save time and allow students to create shapes with equal sides
- (Optional) scissors
Choose whether you will use the Student Handout (based on Philadelphia structures) or your own local images of bridges, overpasses, temporary scaffolding, above-ground subway platforms, or elevated roadways with metal frames exposed. If you use your own structures, you may wish to use Shapes in Bridges (teacher reference) for guidance.
Elicit students’ background knowledge of these structures by projecting pictures asking questions like the following:
- Do you recognize any of these structures? Where are they? (On the handout, the first two pictures are of the Ben Franklin Bridge, connecting Philadelphia to New Jersey over the Delaware River. The second two pictures are elevated train stations on the Market Frankford line in West Philadelphia)
- Where else have you seen structures like this?
- What shapes do you see in these structures? (use this as an opportunity to review vocabulary)
- Which parts of the structure do you think help most for making it really strong? Why?
- Which shapes do you think most help the structure become strong?
- How could we test that out ourselves? (this can lead into the activity)
Support students in using mathematical language to notice features like:
- Parallel lines (or rectangles/trapezoids)
- Many triangles that meet at the same point.
- Squares that are divided into two triangles by a cross-brace.
- Isosceles triangles and right isosceles triangles.
- The posts are perpendicular to the ground. The floor is parallel to the ground.
See Shapes in Bridges (teacher reference) for examples.
Explain to students that they will be making some of the shapes that they saw in the bridges and testing their strength using straws.
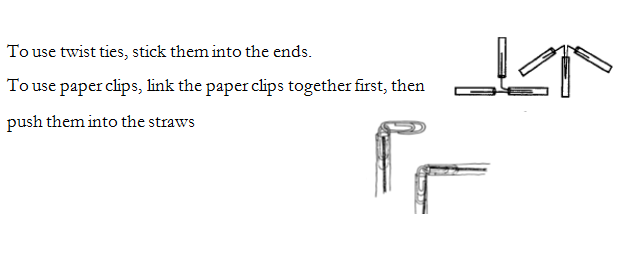
Model how to use the materials. Use either twist ties and coffee stirrers or paperclips and straws.
Model how to build a triangle. Have students identify what kind of triangle it is (equilateral, isosceles, scalene, obtuse, acute, right) Then ask a student to press gently on the corners to try to move the shape. They should notice that it will not move.
- Is it possible to change this shape without taking it apart? Introduce the term rigid.
- Do you think that is true of all triangles? a rectangle? a square?
- What other shapes could we test? (create a list on the board)
Explain that in the explorations, students will create different shapes and test them to see if they are rigid or flexible.
To make the exploration more open ended, challenge students to create as many different triangles and quadrilaterals as they can (focus on congruent sides and angles) After students have made single shapes like triangles and quadrilaterals, they can move on to more complex shapes formed by putting several triangles and quadrilaterals together.
To make it more structured, generate a list of different shapes together or student give students the list of shapes to build and either assign shapes to different groups or have them choose off the list. Focus on having them prove that they've built the shape by identifying the properties.
Students should work in pairs to create and test different shapes.
- When they are done creating a shape, they should sketch it and confirm the classification based on properties. Then press on it gently to see how strong it is.
- They can record their results on the student handout, or using a similar format in their own notebooks.
- Have students keep their shapes when they are done for use in the class discussion (instead of using the parts again to make new shapes).
As student work, ask them to talk about what makes each shape different (focus on side lengths, congruency, and angles). Guide them to think about which shapes are sturdiest:
- What happens when you push on the corners of the shapes? What about when you pull on them?
- What properties of the shape might make that happen? At this point, students may have many hypotheses, some of which are incorrect. Support all of these hypotheses as valuable in scientific research and do not correct misconceptions.
- How could you test your hypothesis? Encourage students to make more shapes to test their hypotheses.
As students work, support them in using their first few shapes to test related shapes with intention.
- Starting with basic triangles and quadrilaterals, attempt to have at least one student in the class create each of the following: equilateral, isosceles, and scalene triangles, right, actute and obtuse triangles, squares, rectangles, rhombuses, parallelograms, trapezoids, isosceles trapezoid, and irregular quadrilaterals.
- Have students combine basic triangles and quadrilaterals to see how they move together. For example, create two triangles that share a side, or a square that shares a side with a triangle. Students may want to try dividing a square with a cross brace to make two triangles, as in the structures.
- (Optional extension) Use the two-dimensional shapes to create three-dimensional shapes, such as cubes, rectangular prisms, triangular pyramids, square pyramids, icosahedrons (triangular pyramids where the base and faces are congruent equilateral triangles), octahedrons, or irregular 3D figures made of quadrilaterals and triangles.
Discuss the patterns that emerged from the exploration. If students are unsure about the patterns, create a two-column chart labeled “Rigid” and “Flexible.” Have students name and describe their shapes, then identify which category they fall into.
- What happens when you push on the corners of the shapes? What about when you pull on them? Introduce the terms rigid and flexible.
- What general patterns do you notice about the types of shapes that are rigid or flexible?
- When students make a claim, have them explain why they are making it and show their shape(s) to the class to demonstrate. Encourage other students to offer counter-arguments or support.
- As students discuss the properties of the triangles they created, reinforce the terms right, acute, and obtuse, isosceles, equilateral, and scalene. As students discuss the properties of quadrilaterals, reinforce the terms square, rhombus, trapezoid, parallelogram, rectangle, right, acute, and obtuse. Students should notice that when the joints are flexible, squares and rhombuses are interchangeable, as are parallelograms and rectangles.
- What features of a triangle were you able to change? What features can’t you change?
- Does changing the properties of the triangle change its strength (rigidity)? Why not?
- Make sure that students recognize that all triangles are rigid while all quadrilaterals are flexible. In 3D figures, quadrilateral faces will be flexible while shapes made of only triangles will be rigid.
Return to the images of bridges and train platforms from the beginning of class. To encourage students to make connections, ask:
- Do you think engineers and architects use this knowledge when they’re building?
- What kinds of things probably push and pull on structures in real life? (gravity, wind, furniture, bricks, etc.)
- When would architects and engineers want structures to be rigid? When might they want them to be flexible?
- Many bridges and tall buildings are built to be mostly rigid, but with a planned amount of flexibility so that they won’t break in a strong wind or earthquake.
- You may wish to share online videos of bridges that survive earthquakes because they have been built with the appropriate amount of flexibility.
- Use one of the rectangles that students have built and add a diagonal. What happens? Why? Engineers call this a cross brace. Return to the pictures from the beginning of class and identify the use of cross braces in the bridges and elevated platforms.
Have students look for more structures that use triangles, quadrilaterals, and cross braces and bring in pictures over the next few days. You will find that you and your students will become more observant of math in the world around them!
Additional extensions:
- Follow this lesson with Lesson 2: Why Are Triangles Rigid?
- See http://www.pbs.org/wgbh/buildingbig/lab/shapes.html for a simulation of the strength of different shapes in building
- Using the materials from this lesson (straws and paperclips or coffee stirrers and twist ties), challenge students to work in groups to build a structure that is as tall as possible in a limited amount of time (20-30 minutes). At the end, have students present their structures and discuss the use of triangles and quadrilaterals to provide stability.
- There are a variety of universities and organizations that sponsor bridge-building contests using popsicle sticks, dry spaghetti, or balsa wood that are tested to see which can hold the most weight. Consider having students submit entries to these contests or host one at your school. (Look for instructions online!)
- If time is limited, you can show a video of students testing bridges they built for a contest. Ask your students to predict which one will be stronger and why: https://www.youtube.com/watch?v=k8hG3xJitAg
- Have students research buildings or bridges that collapsed due to improperly balancing flexibility and rigidity. Students may also find buildings or bridges that are able to withstand great stress from wind or earthquakes due to planning for flexibility.


Comments
(no comments)